
Tools
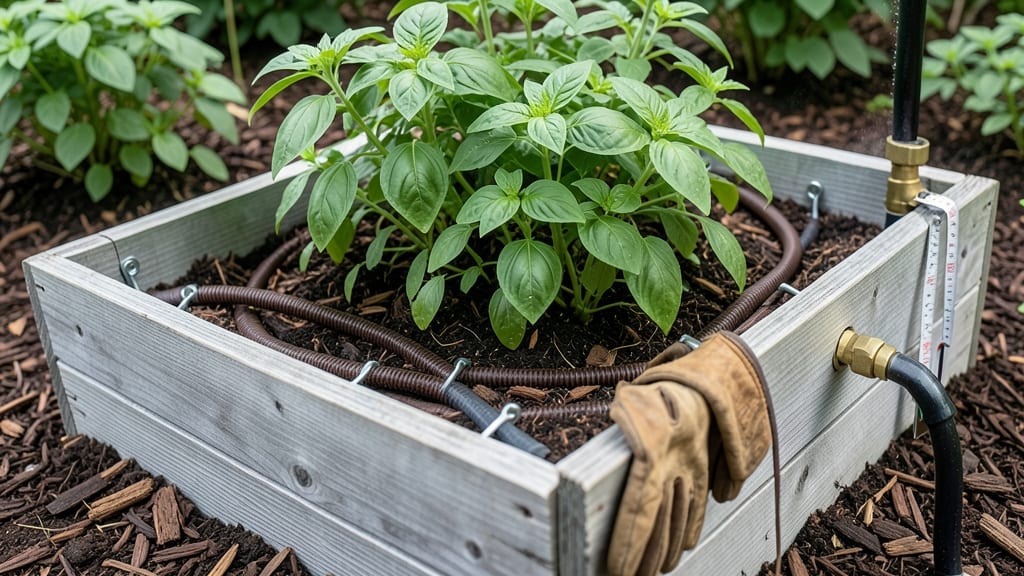
How to install a soaker hose in a raised bed finally gives your garden the watering upgrade it craves. 🌱 These hoses transform your routine—deep, even moisture without waste, and plants that thrive instead of just survive. I installed mine last spring, and the difference in my tomatoes and herbs was shocking within weeks. The right hose makes all the difference: look for 1/4-inch diameter with pores every 6-12 inches—this ensures water reaches roots without pooling. Lay it along the base of plants, not the center, and secure with landscape staples. For 6-foot beds, a single hose works; for wider beds, add a second parallel line. You’ll notice healthier foliage and fewer wilting leaves almost immediately. The hose stays hidden under mulch, and you’ll spend half the time watering while using 30% less water. No more guessing if you’ve watered enough—just consistent, deep moisture where plants need it most. Works for vegetables, flowers, or herbs—just adjust hose length to your bed size. Here’s how to get it right the first time, without leaks or dry spots.
📚 In This Guide
- What you need
- Instructions
- Tips and common mistakes
- Wrapping up and next steps
What you need
- ● Soaker hose: ¼-inch to ½-inch diameter (choose a length that fits your raised bed or buy extra for flexibility). Pro tip: Opt for porous, durable material like recycled rubber or fabric.
- ● Hose connector: 1 (to attach the soaker hose to your water source, e.g., garden hose adapter).
- ● Hose end cap: 1 (to seal the opposite end if not using the full length).
- ● Staples or landscape staples: 10–20 (for securing the hose to the bed’s edges).
- ● Scissors or pruners: 1 (for trimming the hose to size).
- ● Measuring tape: 1 (to ensure proper hose length and spacing).
- ● Water source: Garden hose with adjustable nozzle (for testing flow rate).
- ● Hose clamp or zip ties: 2–3 (to reinforce connections if staples aren’t enough).
- ● Hose filter: 1 (to prevent debris from clogging the soaker hose).
- ● Timer or smart sprinkler controller: 1 (for automated watering on a schedule).
- ● Mulch or landscape fabric: (to protect the hose from sharp bed edges or UV damage).
Step-by-step instructions for installing a soaker hose in a raised bed
Here’s the method I’ve used in every raised bed—it eliminates runoff, saves water, and keeps roots evenly moist without the hassle.
🪴 Step 1: Plan Your Layout for Even Coverage
Measure your raised bed’s dimensions and sketch a simple layout. I like to place the soaker hose along the longest side first, then add a secondary loop if the bed is wider than 18 inches. This ensures water reaches all plants without over-saturating one corner. For a 4-foot-wide bed, two parallel hoses spaced 12 inches apart work perfectly.
Mark the hose path with a pencil or garden stakes—this prevents digging into the soil later. If your bed has rows of plants, align the hose 2-3 inches away from the base of each row. This keeps water from pooling directly at stems, which can cause rot. I always add a small flag at the hose’s starting point to remember where to connect the water source later.
💧 Step 2: Bury the Hose at the Right Depth
Dig a trench about 1-2 inches deep along your marked path using a trowel or your fingers. The hose doesn’t need to be buried deeply—just enough to keep it out of sight and protected from sunlight, which can degrade the material over time. For a 4-foot-long bed, a single trench along one side is usually enough, but wider beds benefit from two parallel trenches.
Lay the hose in the trench, then gently cover it with 1 inch of soil. Press lightly to secure it, but don’t compact the soil—you want roots to grow freely around it. If your bed has mulch, leave a 2-inch gap between the mulch edge and the hose to prevent crushing. I test the fit by running a little water through it before fully burying—this catches any kinks or sharp bends that could block water flow.
✂️ Step 3: Connect and Test for Proper Water Distribution
Attach the hose to your water source (a faucet, drip irrigation system, or soaker hose reel) and turn it on low. Walk along the bed and check for even water flow—you should see a steady, gentle seep along the entire length, not just spurts. If water pools in one spot, adjust the hose path or add a small pinch clamp to slow the flow there.
Run the hose for 10-15 minutes and monitor the soil. The top 2-3 inches should feel evenly moist, but not soggy. If water breaks through to the surface, bury the hose deeper or reduce the flow rate. I like to turn off the water, then dig down 1 inch near the hose to check moisture—this tells me if the water’s reaching the root zone. If it’s dry, I either increase run time or add a second hose loop for wider coverage.
☀️ Step 4: Secure and Protect for Long-Term Use
Once you’ve confirmed even watering, cover the trench with 1-2 inches of fresh soil and smooth it out. For extra protection, especially in heavy rain or freeze-thaw cycles, lay landscape fabric over the hose before adding mulch. This prevents the hose from shifting or getting pinched over time. I also label the hose connection point with a bright flag or spray paint so I don’t accidentally dig into it later.
To maintain the system, flush the hose every 2-3 months by running water through it for 5 minutes—this clears out mineral buildup and keeps the pores open. In winter, disconnect and store the hose if temperatures drop below 32°F to prevent freezing damage. I’ve had the same soaker hose in my raised beds for five years with minimal maintenance, and the plants thrive because they get consistent, deep watering without waste.
Tips & tricks for perfect soaker hose installation
These simple strategies will help you avoid common pitfalls and get the most out of your deep-watering system.
Layout Precision: For beds wider than 18 inches, I recommend using two parallel hoses spaced exactly 12 inches apart—this creates a uniform watering pattern that eliminates dry spots. The key is maintaining equal distance between hoses and the bed edges. If your bed has irregular shapes, sketch the layout first and measure twice to ensure perfect alignment before digging. Trust me on this: uneven spacing leads to overwatered corners and underwatered centers.
Hose Path Testing: Before fully burying the hose, run a quick test by attaching it to your water source and letting it seep for just 2-3 minutes. Watch for any kinks or sharp bends that could restrict flow—these are easy to miss when you're focused on digging. I've found that gently flexing the hose while it's dry helps identify potential problem areas before they become issues. This simple step prevents the frustration of discovering flow problems after you've already buried the hose.
Soil Moisture Check: After your 10-15 minute test run, dig down 1 inch near the hose to check moisture levels. The soil should feel damp but not saturated—this is your target zone. If it's dry, either increase your run time by 2-3 minutes or add a second hose loop. For clay-heavy soils, I recommend running the hose for the full 15 minutes initially, as these soils absorb water more slowly. This visual check is more reliable than guessing based on surface moisture alone.
Winter Protection: When temperatures approach 32°F, disconnect the hose and store it in a protected location. I've learned this the hard way after leaving a hose connected through a mild winter—it froze solid and burst when temperatures dropped suddenly. For extra protection, wrap the hose in a coil and store it in a bucket of water to prevent drying out. This simple maintenance step extends your hose's lifespan significantly and saves you from costly replacements.
Pro Tips for Install A Soaker Hose In A Raised Bed
- These simple strategies will help you avoid common pitfalls and get the most out of your deep-watering system.
- Layout Precision: For beds wider than 18 inches, I recommend using two parallel hoses spaced exactly 12 inches apart—...
- Hose Path Testing: Before fully burying the hose, run a quick test by attaching it to your water source and letting i...
Frequently asked questions
Got questions about soaker hoses in raised beds? You’re not alone! Here are answers to the most common concerns to help you water like a pro.
How deep should the soaker hose be buried in a raised bed?
For most plants, bury the soaker hose 2–3 inches deep along the sides of the bed. This ensures even moisture distribution to roots while keeping the hose protected from direct sunlight and debris. Shallow-rooted plants (like herbs) may only need 1–2 inches of coverage.
When is the best time to install a soaker hose in a raised bed?
The ideal time is before planting or during the off-season (fall or early spring). This lets you lay it out neatly without disturbing roots. If you’re retrofitting, water the bed first to soften the soil, then gently tuck the hose into place.
Can I use a regular garden hose as a soaker hose?
Not effectively! Regular hoses lack the porous design to deliver slow, even watering. However, you can poke small holes along a garden hose (spaced 6–12 inches apart) as a budget-friendly alternative. Just secure it well to avoid shifting.
Why is my soaker hose leaking from the ends or cracks?
Leaks often happen if the hose is damaged or the ends aren’t capped. Always use end caps or connectors and check for punctures. If leaks persist, try a soaker hose repair kit or replace the damaged section. Avoid over-pressurizing—keep water flow at 10–20 PSI.
How often should I water with a soaker hose in a raised bed?
Frequency depends on your climate, soil, and plants. As a rule, water deeply 2–3 times per week (or daily in extreme heat). Monitor soil moisture—stick your finger 1–2 inches down; if dry, it’s time to water. Mulch helps retain moisture between sessions!
Can I reuse a soaker hose from year to year?
Soaker hoses are durable but may degrade over time. Store them coiled in a dry place when not in use, and inspect for cracks or clogs before each season. Replace every 3–5 years for best performance.
Wrapping up and next steps
Installing a soaker hose in your raised bed is a game-changer for efficient, waste-free watering—and you’ve got this! 🌱 With the right tools and a little patience, you’ll enjoy healthier plants, less maintenance, and a greener thumb in no time.
Now that you’re equipped with the know-how, take the next step: grab your supplies, pick a sunny day, and give your garden the deep hydration it deserves. Happy planting! 🌞