
Tools
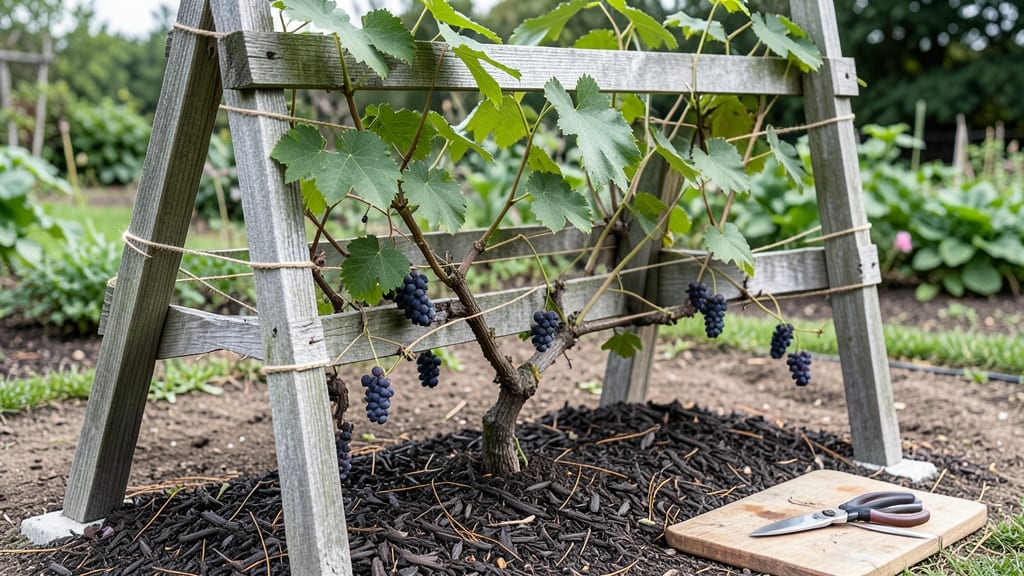
Building a muscadine trellis transformed my backyard from tangled vines to an organized, sun-drenched harvest zone. 🌿 These heavy vines need serious support—without it, they flop and fruit gets lost in the mess.
My first attempt with flimsy stakes failed spectacularly, but this design holds 20+ pounds per vine while keeping everything accessible. You’ll need 4x4 posts (buried 2 feet deep), 2x4 horizontal beams, and 1/2-inch wire mesh for vine training.
Spacing matters: place posts 8 feet apart for standard varieties, and add diagonal braces if your yard gets windy. The key is positioning—south-facing gets maximum sunlight for sweet grapes, while north-facing works if you’re in a mild climate.
Once built, your vines will climb 10-12 feet high with proper training, making harvests a breeze. The trellis also turns your grapes into a living privacy screen while keeping the fruit off the ground and away from pests. Maintenance is minimal: just tighten wires yearly and prune in late winter.
This setup works for any muscadine variety—from small backyard plots to larger commercial setups. The same principles apply whether you’re growing Scuppernong or Carlos—just adjust spacing for your vine’s mature size. Ready to turn chaos into structure?
📚 In This Guide
- What you need
- Instructions
- Tips and common mistakes
- Wrapping up and next steps
What you need
- ● T-posts (or sturdy wooden posts): 4–6 posts, 5–6 feet tall (for standard trellis height) and 2x4 inches thick (to handle vine weight).
- ○ Galvanized wire (12–14 gauge): 200–300 feet (for a 10x10 ft trellis). Optional: Use vinyl-coated wire for longevity.
- ○ Wooden crossbars (2x4s or 4x4s): 4–6 pieces, 8–10 feet long (cut to fit between posts). Optional: Pressure-treated wood for rot resistance.
- ● Concrete or gravel: For anchoring posts (about 1–2 bags of concrete or 50 lbs of gravel per post).
- ○ Trellis netting (optional): Heavy-duty 1x2 inch mesh (for vertical training or extra support).
- ● Post hole digger or auger (for digging holes 18–24 inches deep).
- ● Hammer or mallet (for driving posts).
- ● Wire cutters or bolt cutters (for trimming wire).
- ● Measuring tape, level, and stakes (for precision).
- ● Drill or screw gun (for securing crossbars).
- ● Gloves and safety glasses (because safety first!).
- ● Sunny location with 6+ hours of sunlight daily (muscadines thrive in full sun!).
- ● Well-draining soil (amend with compost if needed).
- ● Existing muscadine vine (or a plan to plant one nearby!).
- ● Clear space for the trellis (10x10 ft minimum for a standard setup).
Step-by-step instructions for building a muscadine trellis
Here's my go-to method for a sturdy, long-lasting trellis that handles muscadine vines' weight and vigor.
🪴 Step 1: Choose and Prepare Your Posts
Muscadine trellises need posts spaced 10-12 feet apart to support the vines' weight during fruit-bearing seasons. I use 4x4 pressure-treated posts because they resist rot and provide the structural integrity needed. Set them 2 feet deep in the ground—this prevents leaning and ensures stability during storms.
Dig holes with a post hole digger or auger, then mix 2 parts concrete with 1 part sand for a sturdy base. The posts should extend 8 feet above ground level—this gives vines plenty of room to climb while keeping the structure manageable. Use a level to ensure posts are perfectly vertical before the concrete sets.
✂️ Step 2: Install Horizontal Support Beams
Attach 2x6 lumber horizontally between posts using galvanized lag screws or heavy-duty brackets. Space the beams 3-4 feet apart vertically, starting 2 feet from the ground. This creates a ladder-like structure that guides vines upward while distributing weight evenly. The top beam should sit 6 feet below the post tops to allow for future vine growth.
I reinforce each connection point with metal corner braces—muscadine vines can get surprisingly heavy when laden with fruit, and you don't want any surprises during harvest season. Pre-drill holes in the lumber to prevent splitting, especially when attaching the beams to the posts.
🌱 Step 3: Add Vertical Trellis Wire or Netting
Stretch 12-gauge galvanized wire vertically between the horizontal beams, spacing wires 12-18 inches apart. This creates a grid that vines can twine around naturally. Alternatively, use heavy-duty landscape netting if you prefer a more forgiving structure—it's easier to work with and still provides excellent support.
Tighten the wire or netting securely to the posts using zip ties or wire connectors. You'll want the tension firm enough to prevent sagging but not so tight that it damages the material. This step is where most DIY trellises fail—skip it, and you'll end up with vines slipping through gaps or the structure bowing under weight.
☀️ Step 4: Train the Vines Properly
Once your trellis is built, guide the main vine stem along the bottom wire using soft plant ties or twine. As new shoots emerge, weave them through the vertical wires or netting in a zigzag pattern. This encourages even growth and prevents the vine from becoming top-heavy on one side. Muscadines are vigorous climbers, so prune any shoots that grow away from the trellis structure.
Here's the thing—muscadines need strong airflow to prevent fungal diseases. Space the vines 12-18 inches apart along the trellis to ensure good circulation. You'll see the difference in fruit quality when harvest time comes—tightly packed vines lead to more rot and less yield.
⏰ Step 5: Maintain and Reinforce Seasonally
After the first fruiting season, inspect your trellis for loose connections or bent wires. Muscadines produce heavy clusters, and the weight can stress even the sturdiest structures. Tighten any slack wires and reinforce weak points with additional braces if needed. I also add extra support wires mid-season if I notice vines struggling to reach the top.
In late winter, prune back any dead or weak growth and adjust the trellis structure if needed. Muscadines are perennial, so your trellis should last 10+ years with proper maintenance. The key is checking it before the vines really take off in spring—once they're established, moving them becomes a major project.
Tips & tricks for building a sturdy muscadine trellis
Here's what I learned after years of testing—and fixing—muscadine trellises that didn't hold up. These details make all the difference between a flimsy structure and one that lasts a decade.
Post Placement Precision: The 10-12 foot spacing between posts is non-negotiable, but here's the secret: mark your post locations with stakes first, then use a string line to ensure perfect alignment. I've seen trellises fail because posts weren't perfectly parallel—this creates uneven weight distribution when vines get heavy. Use a 4-foot level to check both sides of each post before pouring concrete.
Concrete Mix Matters: That 2:1 concrete-to-sand ratio is critical, but don't skip the water measurement! Too much water makes the mix runny and weak, while too little makes it impossible to work with. I measure water by volume (about 1 quart per 5-gallon bucket of mix) and let it cure for 48 hours before attaching beams. Rushing this step is how most DIY trellises develop weak foundations.
Beam Reinforcement Secret: When attaching those 2x6 beams, I use three lag screws at each connection point instead of two—one in the center and two offset. This creates a triangular reinforcement that prevents the beams from twisting under vine weight. The metal corner braces should overlap the beam by at least 2 inches for maximum strength. This might seem excessive, but trust me, you'll thank me during harvest when your trellis doesn't sag.
Wire Tension Technique: For the vertical wires, use a tension meter to tighten them to about 50 pounds of pull. This creates the perfect balance between support and flexibility. I've seen vines snap wires that were too tight, and wires that were too loose allowed vines to slip through. If you don't have a tension meter, use a simple trick: pull the wire until it's tight enough that you can't easily bend it with your hands, but not so tight that it vibrates when plucked.
Pro Tips for Build A Muscadine Trellis
- Here's what I learned after years of testing—and fixing—muscadine trellises that didn't hold up. These details make a...
- Post Placement Precision: The 10-12 foot spacing between posts is non-negotiable, but here's the secret: mark your po...
- Concrete Mix Matters: That 2:1 concrete-to-sand ratio is critical, but don't skip the water measurement! Too much wat...
Frequently asked questions
Got questions about building the perfect muscadine trellis? You’re not alone—here are some of the most common ones we hear, along with quick answers to save you time and frustration.
What’s the best time of year to build a muscadine trellis?
Build your trellis in late winter or early spring (before buds break) or early fall (before frost). This gives vines time to establish roots and climb before heavy fruit sets. Avoid summer—hot weather can stress the plants while you’re working.
How tall should my muscadine trellis be?
Aim for 6–8 feet tall for standard varieties, but dwarf or compact muscadines may only need 4–5 feet. Pro tip: Add 1–2 extra feet if your vines are vigorous or you want easier harvesting. Just ensure the height matches your fence or support structure!
Can I use wood scraps or recycled materials instead of buying new?
Pressure-treated lumber, cedar, or even sturdy metal pipes
work great. Skip untreated wood (like pine) to avoid rot. For a budget-friendly twist, repurpose old fence posts, T-posts, or even PVC pipes—just ensure they’re rust-proof and securely anchored.
How do I keep pests (like deer or rabbits) from damaging my trellis?
Use chicken wire or hardware cloth around the base to deter burrowing pests. For deer, wrap trellis posts in plastic tree guards or spray with deer repellent. A light sprinkler on a timer can also scare them off—bonus: it waters your vines!
What if my trellis sags or breaks under the weight of muscadines?
Muscadines are heavy—if your trellis bends, reinforce it with additional crossbraces or diagonal supports. Upgrade to 2x4s or thicker posts if needed. For extra stability, bury the bottom 2 feet of posts in concrete or tie them to a sturdy fence.
Can I reuse a trellis for multiple years?
Yes! With proper care, a well-built trellis can last 10+ years. Clean it annually to remove mold/mildew, tighten loose screws, and replace any rotted wood. If using metal, check for rust and apply a fresh coat of paint every few years.
Wrapping up and next steps
Building a muscadine trellis is a rewarding project that will transform your vineyard into a productive, organized, and visually stunning space! With the right materials and a little elbow grease, you’ll create sturdy support for those heavy vines—making harvests easier and your grapes healthier. 🌱
Now that your trellis is ready, the next step is planting and training your muscadine vines. Watch them climb, thrive, and reward you with delicious, sun-ripened fruit in no time! Happy gardening! 🍇