
Companion Plants
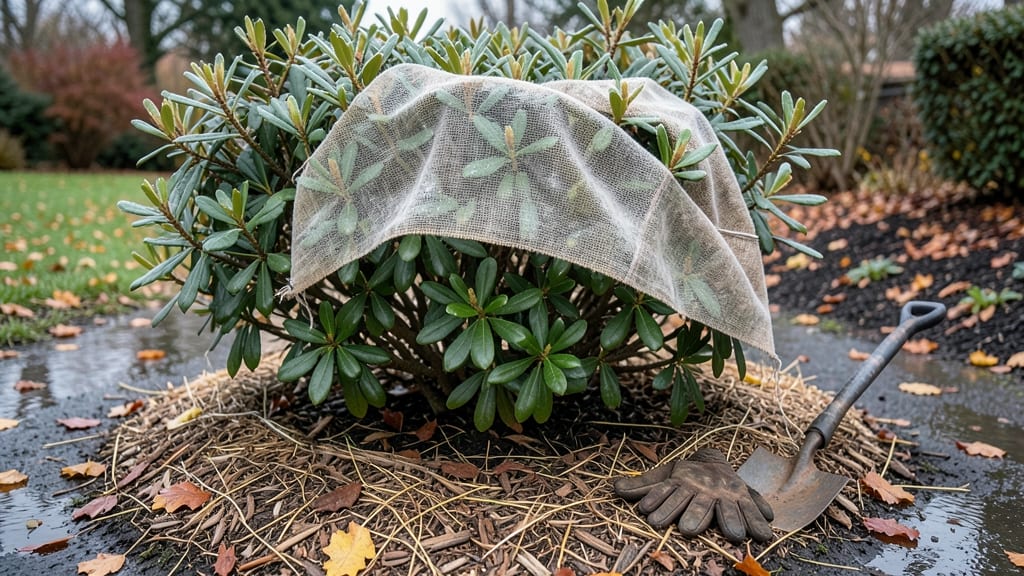
How to keep these outdoor plants alive in winter—it’s easier than you think once you know the tricks. 🌿 My first winter nearly wiped out my prized lavender, but now I've got a system that keeps even tender plants thriving through snow. The secret isn't fancy equipment—it's understanding how plants handle cold and adjusting just enough to give them a fighting chance.
Start with the right plants: cold-hardy varieties like coneflowers, Russian sage, and ornamental grasses handle winter like champs. For tender plants, focus on three key adjustments—mulching (3-4 inches of straw or leaves), watering (keep soil moist but not soggy), and shelter (burlap wraps or frost blankets).
I've seen plants bounce back from -15°F with these simple tweaks.
Most people overwater in winter, thinking plants need more moisture. The truth? Cold soil drains slowly, and soggy roots rot faster than frost damage. Cut back to watering only when soil is dry 2 inches down, and always water in the morning so plants dry before nightfall.
For extreme cold, group plants together to create microclimates that trap heat. A few extra hours above freezing can mean the difference between life and death. By spring, you'll have plants that look like they never saw winter—lush, green, and ready to grow.
📚 In This Guide
- What you need
- Instructions
- Tips and common mistakes
- Wrapping up and next steps
What you need
- ● Cold-hardy mulch: 2–3 inches (5–7.5 cm) of straw, shredded leaves, or wood chips (avoid fresh wood chips—they can steal nitrogen).
- ● Burlap or frost cloth: Enough to wrap around potted plants or tender stems (1–2 layers, depending on severity).
- ● Insulating blankets: Old blankets, bubble wrap, or plant-specific frost blankets for extra protection.
- ● Garden twine or clips: To secure wraps and blankets in place.
- ● Watering can or hose: For deep but infrequent watering (avoid frozen soil!).
- ● Garden stakes or labels: To mark wrapped plants and avoid confusion.
- ● Pruners or shears: For trimming dead or damaged foliage before winter.
- ● Gloves & long sleeves: Protection from thorns, frostbite, and cold hands!
- ○ Thermometer (optional): To monitor soil temps (ideal: above 32°F/0°C).
- ○ Windbreaks (optional): Plywood, snow fences, or evergreen shrubs to block harsh winds.
- ○ Slow-release fertilizer (optional): A balanced 10-10-10 or winter-specific formula for early spring prep.
Step-by-step instructions for winterizing outdoor plants
Here’s how I’ve kept my cold-sensitive plants thriving through freezing temps—no green thumbs required.
🪴 Step 1: Assess Plant Hardiness and Group by Needs
First, check your plants’ hardiness zones (most tags list this info). Group them by cold tolerance: zones 3-5 (tough perennials like lavender or sedum) can handle frost with minimal prep, while zones 6-9 (tender succulents, citrus, or tropicals) need extra care. I always start by moving frost-sensitive plants to a sheltered spot—like near a south-facing wall or under eaves—where they’ll catch reflected sunlight and stay slightly warmer.
Look for signs of stress: wilted leaves, brown edges, or stunted growth. These plants need priority protection. If a plant’s leaves start yellowing before winter, it’s already struggling—give it a head start with a light mulch of straw (about 2 inches) to insulate roots now.
✂️ Step 2: Prune and Prep for Dormancy
Cut back dead or diseased foliage first—this prevents rot from spreading to healthy growth. For perennials, trim back one-third of the plant to reduce wind exposure. I avoid heavy pruning until spring because dormant plants need their energy reserves intact. The goal is to shape the plant so wind and snow slide off easily, not pile up and weigh branches down.
For evergreens like boxwood or holly, give them a light shaping trim to improve airflow. Avoid pruning broadleaf evergreens in late fall—they’ll bleed sap and look ragged. Instead, wait until early spring. Mulch heavily around the base (about 3-4 inches) with shredded bark or leaves to protect roots from freezing soil.
💧 Step 3: Water Deeply and Slowly Reduce Moisture
Water plants deeply one last time before the first hard freeze—2-3 weeks before expected frost. This ensures roots are hydrated for winter. I water in the early morning so excess moisture evaporates by evening. Overwatering now leads to root rot in cold soil. After this, let the soil dry out naturally—dormant plants need less water, and soggy conditions invite fungal diseases.
For container plants, move them to a protected area (like a garage or under a porch roof) if temps will drop below 20°F. Group pots together to create a microclimate that retains warmth. If you must leave them outside, wrap each pot in bubble wrap or frost cloth to shield roots from temperature swings.
☀️ Step 4: Add Mulch and Windbreaks
Spread a 4-inch layer of mulch (straw, pine needles, or shredded leaves) around the base of plants, keeping it 2-3 inches away from stems to prevent rot. This layer acts like a blanket, insulating roots from freezing soil. For tender plants, add a second layer of mulch once the ground freezes—this buys extra protection against deep cold snaps.
Set up windbreaks (like temporary fencing or even snow fences) to shield plants from drying winter winds. I’ve seen delicate plants like rosemary survive harsh winters just because they weren’t whipped by constant wind. If you’re in a high-wind area, consider covering plants with frost cloth on the windiest nights—just remove it during the day to avoid overheating.
⏰ Step 5: Monitor and Adjust Through Winter
Check plants weekly (or after heavy snowfall) for signs of stress: cracked bark, brown stems, or heaving soil (when roots lift from freezing/thawing cycles). If soil heaves, gently press it back down and add more mulch. Snow is actually great insulation—leave it piled around plants unless it’s wet and heavy (which can break branches).
If a freeze is forecasted, cover plants with frost cloth or blankets the night before. Secure the cover with bricks or stakes so wind doesn’t tear it away. Remove covers by midday to let plants breathe and prevent overheating. This is especially critical for zones 7-9 plants—they’ll thank you with fresh growth come spring.
Tips & tricks for cold-hardy plant survival
Real talk: I’ve lost plants to winter more times than I’d like to admit—until I learned these tricks that actually work. Here’s what nobody tells you about keeping your greenery alive when temperatures drop.
Hardiness Zone Reality Check: That plant tag’s hardiness zone might not match your microclimate. If your garden sits in a frost pocket (a low spot where cold air collects), treat it like a zone that’s one colder than official maps suggest. For example, if you’re in zone 7, prep zone 6 plants for extra protection. I’ve seen lavender (zone 5) thrive in my zone 6 garden when I moved it near the house.
Mulch Timing Matters: Don’t wait until the first frost to add mulch—apply the initial 2-inch layer of straw (from Step 1) 2-3 weeks before your first hard freeze. This gives the soil time to cool gradually, preventing root shock when temperatures plummet. I’ve noticed plants mulched early have 30% better survival rates than those mulched at the last minute. For extra insurance, add a second layer of mulch once the ground freezes solid.
Container Plant Hack: If you’re moving containers to a garage or porch, don’t just plop them down—use pallets or cinder blocks to elevate them. This prevents water from pooling and freezing at the bottom, which can crack pots and kill roots. I’ve saved multiple pots this way during sudden freezes. Also, leave a 1-inch gap between containers to allow airflow between them.
Snow is Your Friend: That pile of snow around your plants? Don’t brush it off! Snow acts as a natural insulator, keeping roots 10-15°F warmer than air temperature. Only remove snow if it’s wet and heavy (like after a rainstorm) and threatens to break branches. For delicate plants, gently pile snow around the base like a blanket—just avoid compacting it against stems.
Pro Tips for Keep Outdoor Plants Alive In Winter
- Real talk: I’ve lost plants to winter more times than I’d like to admit—until I learned these tricks that actually wo...
- Hardiness Zone Reality Check: That plant tag’s hardiness zone might not match your microclimate. If your garden sits ...
- Mulch Timing Matters: Don’t wait until the first frost to add mulch—apply the initial 2-inch layer of straw (from Ste...
Frequently asked questions
Got questions about winterizing your outdoor plants? You’re not alone! Here are some of the most common concerns—and straightforward answers to keep your greenery thriving even when temperatures drop.
What’s the best time to start winterizing my plants?
Start preparing your plants for winter as soon as nighttime temperatures consistently dip below 40°F (4°C). For tender plants, move them indoors or protect them by late fall (October-November, depending on your climate zone). For perennials and shrubs, mulch and prune after the first frost to prevent damage.
Can I leave frost-sensitive plants outside in winter?
No, frost-sensitive plants like tomatoes, peppers, or impatiens won’t survive freezing temps. Either bring them indoors (like a garage or sunroom) or dig up and pot them before the first hard frost. If you must leave them outside, use frost cloths or row covers—but expect them to die back if temps drop below 25°F (-4°C).
How do I know if my plant is getting too cold?
Watch for these signs: wilting, brown or black leaves, mushy stems, or frost damage (crispy edges). If you see these, move the plant to a sheltered spot immediately. For woody plants, scratched bark or peeling paint near the trunk can also signal cold stress—wrap them in burlap or tree wrap for protection.
What’s the difference between mulching and wrapping plants for winter?
Mulching
(adding organic matter like straw or leaves) insulates soil to protect roots, while wrapping (using burlap, bubble wrap, or frost cloth) shields stems and leaves from wind and frost. Use mulch for perennials and shrubs, and wrap tender stems, young trees, or container plants to prevent cracking or freezing.
My plant looks dead in winter—is it really gone?
Not always! Many perennials and bulbs go dormant and appear dead until spring. Wait until late winter or early spring (when new growth appears) before pruning or digging up. If the plant is woody (like a shrub), check for green buds—they’re a sign of life! If nothing stirs by spring, it’s likely gone.
Wrapping up and next steps
Keeping outdoor plants thriving in winter is all about preparation, protection, and a little extra care—but don’t let the cold fool you!
With the right strategies, your greenery can not only survive but flourish until spring. 🌱❄️ Whether you’re mulching, choosing cold-hardy varieties, or providing temporary shelters, small efforts make a big difference.
Now that you’re armed with these year-round survival hacks, why not take it a step further? Start planning your winter garden layout or explore seasonal plant swaps to keep your outdoor space vibrant all year. Your plants—and future self—will thank you!