
Watering
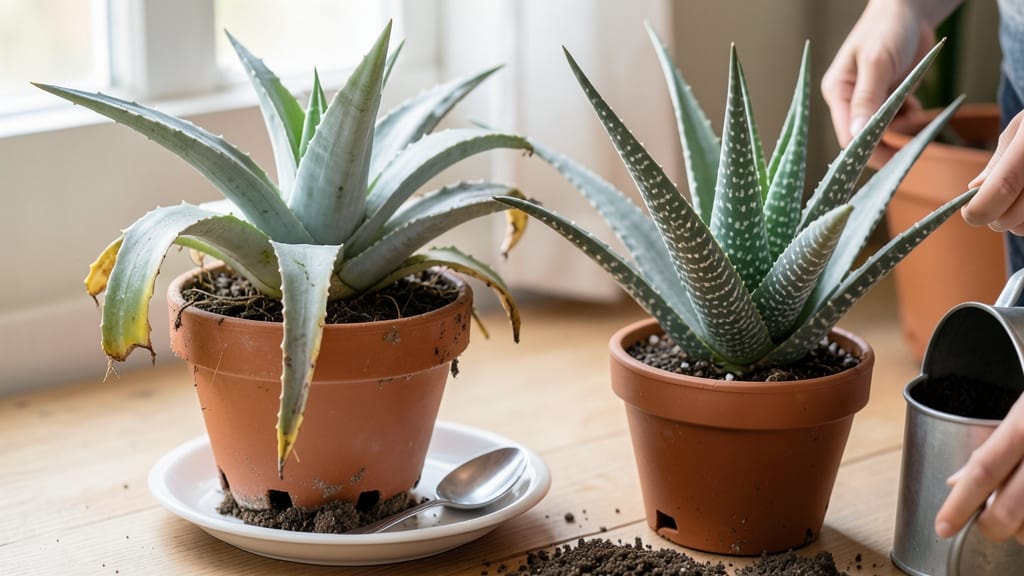
Your aloe’s mushy leaves and sad droop mean one thing: too much love in the watering department. 🌱 Here’s how to fix an overwatered aloe—the secret isn’t complicated, but it is urgent.
I’ve nursed back more overwatered aloes than I’d like to admit, and the solution boils down to draining, drying, and reviving before the roots turn to mush. The good news? Even severely stressed plants can bounce back with the right approach, and you’ll see new growth within weeks.
First, stop watering immediately—no exceptions. Then, gently remove the plant from its pot and inspect the roots. Healthy roots are firm and white; black, slimy, or mushy roots need trimming. Repot in fresh, well-draining cactus/succulent mix, and place the plant in a spot with bright, indirect light.
The key now is patience: let the soil dry out completely between waterings, and avoid saucers that trap moisture.
Within 2-4 weeks, you’ll notice the plant perking up as it sheds damaged leaves and grows new ones. The soil will recover its crumbly texture, and your aloe will start storing water like it’s supposed to.
This isn’t just about survival—it’s about setting your plant up for long-term resilience so you never face this crisis again.
Confession: I once lost three aloes to overwatering before I learned this method. Now, I check soil moisture with my finger before watering—always—and my plants thrive.
The lesson? Aloe plants are tough, but they’re not drought-proof; they’re drought-loving, and they’ll forgive you if you act fast. Let’s get yours back on track.
📚 In This Guide
- What you need
- Instructions
- Tips and common mistakes
- Wrapping up and next steps
What you need
- ● Well-draining potting mix: 2–3 gallons (7.5–11 liters) of a cactus/succulent blend (e.g., 50% potting soil + 50% perlite/pumice). Avoid regular garden soil!
- ● Clean pot with drainage holes: Slightly larger than the current pot (1–2 inches wider in diameter). Ensure it’s sterilized (scrub with soapy water or use 1 part bleach to 9 parts water).
- ○ Gloves (optional but recommended): A pair of nitrile or rubber gloves to protect your hands from sap and bacteria.
- ● Sharp, sterilized knife or pruning shears: For trimming rotted roots. Wipe with rubbing alcohol before use.
- ● Hydrogen peroxide (3% solution): ½ cup (120 mL) to disinfect roots and prevent fungal/bacterial growth.
- ● Spray bottle with water: For gentle misting (avoid soaking!).
- ● Paper towels or clean cloth: To pat dry roots and excess moisture.
- ○ New charcoal-based soil additive (optional but helpful): ¼ cup (60 mL) of orchid bark or activated charcoal to improve drainage and reduce odor.
- ● Rooting hormone: A small tube of powder or gel to boost regrowth if roots are severely damaged.
- ● Fungicide (like neem oil or copper fungicide): 1–2 sprays to prevent future rot if you spot mold or mushy spots.
- ● Heat mat or warm spot: A low-heat mat (50–70°F) to encourage faster root recovery (place under the pot after replanting).
- ● Humidity tray: A shallow tray with pebbles and water (not touching the pot) to maintain low humidity while the plant recovers.
Step-by-Step instructions for reviving overwatered aloe
Here’s how to rescue your soggy aloe in just days—no special supplies needed.
💧 Step 1: Stop Watering Immediately and Assess Damage
First, halt all watering—even if the soil feels dry. Overwatered aloe can’t recover while moisture keeps stressing the roots. Gently remove the plant from its pot and inspect the roots. Healthy roots are firm and white, while mushy, brown, or black roots signal rot. If more than half the roots are damaged, don’t panic—you can still save it.
I like to tap the root ball lightly on a clean surface to loosen soil and spot hidden damage. If the plant smells foul or feels squishy, it’s a clear sign of overwatering. Don’t water again until you’ve completed the drying process—this is the fastest way to stop the rot.
✂️ Step 2: Trim Damaged Roots and Repot in Fresh Soil
Using sterilized scissors or pruners, snip away all mushy, discolored roots. Cut healthy roots cleanly at the base, leaving only firm, white sections. This might seem drastic, but aloe plants regenerate quickly from healthy root tissue. After trimming, rinse the roots under lukewarm water to remove excess soil and debris.
Fill a clean pot with well-draining cactus/succulent mix—never regular potting soil. Aloe needs grit to prevent future waterlogging. I use a terracotta pot with drainage holes because it wicks away excess moisture. Repot the trimmed plant, ensuring the base sits just below the rim. Press the soil lightly around the roots to secure it without compacting.
☀️ Step 3: Provide Bright Light and Zero Moisture for 7–10 Days
Place the repotted aloe in bright, indirect light—like a south-facing window with sheer curtains. Direct sun can stress the plant further while it recovers, but low light slows healing. Watch for new growth at the base within 7–10 days; this signals the roots are stabilizing. Avoid watering during this period—even a sip can reignite rot.
If your home is humid, prop the pot on a layer of pebbles to improve airflow. You’ll know the plant is ready for water when the top 2 inches of soil feel completely dry to the touch. This might take 2–3 weeks, but patience prevents future overwatering.
🌱 Step 4: Gradually Resume Care with Smaller Watering Intervals
After the 10-day dry period, water deeply but sparingly—only when the soil is bone-dry. Stick your finger 2 inches into the soil; if it’s dry, water until it drains from the bottom. Discard any excess in the saucer to avoid soggy roots. Over the next month, reduce watering to every 3–4 weeks in summer or monthly in winter—aloe stores water in its leaves, not roots.
Fertilize lightly with a diluted succulent fertilizer (half-strength) once in spring to support recovery. You’ll notice new leaves forming at the base—these are your plant’s way of saying, “Thanks for saving me!”—and old, wrinkled leaves may drop naturally. That’s normal; focus on the fresh growth.
⏰ Step 5: Monitor for Signs of Recovery and Prevent Future Issues
Within 4–6 weeks, your aloe should show thicker, upright leaves and a firmer stem. If it’s still weak, repeat the drying process—sometimes roots need extra time to heal. Keep an eye out for yellowing leaves, which can signal overwatering or underwatering. If leaves pucker, it’s thirsty; if they turn mushy, you’re watering too much.
To prevent future overwatering, use the "finger test" before watering: Insert your finger into the soil. If it feels damp past 2 inches, wait. I also recommend grouping aloe with other succulents to create a dry microclimate—they all thrive on neglect! With this method, your aloe will bounce back faster than you think.
Tips & tricks for reviving overwatered aloe
Here's the thing—aloe plants are tough, but they need the right care to bounce back from overwatering. These small tweaks make all the difference.
Root Inspection Tip: When checking roots in Step 1, look for the color transition—healthy roots should be crisp white, while damaged ones turn brown or black. I've learned to use a flashlight to spot hidden rot in dark soil. If you find more than half the roots damaged, don't worry—aloe can regrow from just a few healthy roots. The key is to act fast before mold spreads.
Soil Selection Strategy: For Step 2, mix your cactus/succulent soil with perlite or pumice (about 20% by volume) to create even better drainage. I've seen aloe recover faster when the soil has this extra grit—it prevents future waterlogging. Avoid anything labeled "moisture-retaining" mix, even if it says "for succulents."
Light Positioning: In Step 3, place your aloe within 12 inches of a bright window, but not in direct sun. I've noticed the best recovery happens when the light is bright but diffused—think morning sunlight through sheer curtains. If your windows are too dark, supplement with a grow light for 12 hours daily. The goal is to mimic aloe's natural desert conditions without scorching it.
Watering Check: Before watering in Step 4, stick your finger all the way to the 2-inch mark—if it feels damp anywhere, wait another week. I've made the mistake of watering too soon after repotting, and the roots would just sit in wet soil, slowing recovery. Remember, aloe stores water in its leaves, not roots, so it can handle dry spells better than most plants.
Pro Tips for Fix Overwatered Aloe
- Here's the thing—aloe plants are tough, but they need the right care to bounce back from overwatering. These small tw...
- Root Inspection Tip: When checking roots in Step 1, look for the color transition—healthy roots should be crisp white...
- Soil Selection Strategy: For Step 2, mix your cactus/succulent soil with perlite or pumice (about 20% by volume) to c...
Frequently asked questions
Got questions about saving your soggy aloe? You’re not alone!
Here are the most common concerns—and quick fixes—to get your plant back to happy, thirsty health.
How do I know if my aloe is actually overwatered?
Check for these red flags: mushy, translucent leaves (especially at the base), yellowing tips, or a rotten, foul-smelling stem. If the soil feels damp or soggy more than 2–3 inches down, your aloe is drowning. Pro tip: Gently tug on the plant—if it slides out easily, roots may be rotting!
How long does it take for an overwatered aloe to recover?
With proper care, you’ll see improvement in 1–3 weeks, but severe cases (like blackened stems) may take 4–6 weeks to heal. Focus on drying the soil first, then ease back into watering. Patience is key—aloe’s a survivor!
Can I save an aloe with black spots or mushy stems?
Yes, but act fast! Trim away soft, blackened areas with sterilized scissors (leave healthy green tissue). Repot the plant in fresh, gritty soil and let it dry out completely. If the root ball is fully mushy, propagate the healthy offsets instead.
Should I water an overwatered aloe right after repotting?
Nope!
Wait 7–10 days before watering to let roots establish. Overwatering after repotting = double trouble. Instead, mist the leaves lightly (if needed) and keep it in bright, indirect light to encourage recovery.
What’s the best soil mix to prevent future overwatering?
Use a fast-draining blend: 50% cactus/succulent soil, 30% perlite or pumice, and 20% coarse sand. Add a handful of orchid bark for extra aeration. Avoid peat-heavy mixes—they hold too much moisture!
Wrapping up and next steps
Fixing an overwatered aloe is totally doable—just drain, dry, and revive with patience and care! 🌱 By adjusting your watering habits, repotting properly, and giving your plant time to recover, you’ll see those plump, healthy leaves return. Remember, aloe thrives on neglect—so less water is always better!
Ready to save your plant? Start by monitoring its progress and gradually reintroduce water once the roots show signs of healing. Check out our watering guide for long-term tips to keep your aloe happy and resilient!