
Succulent
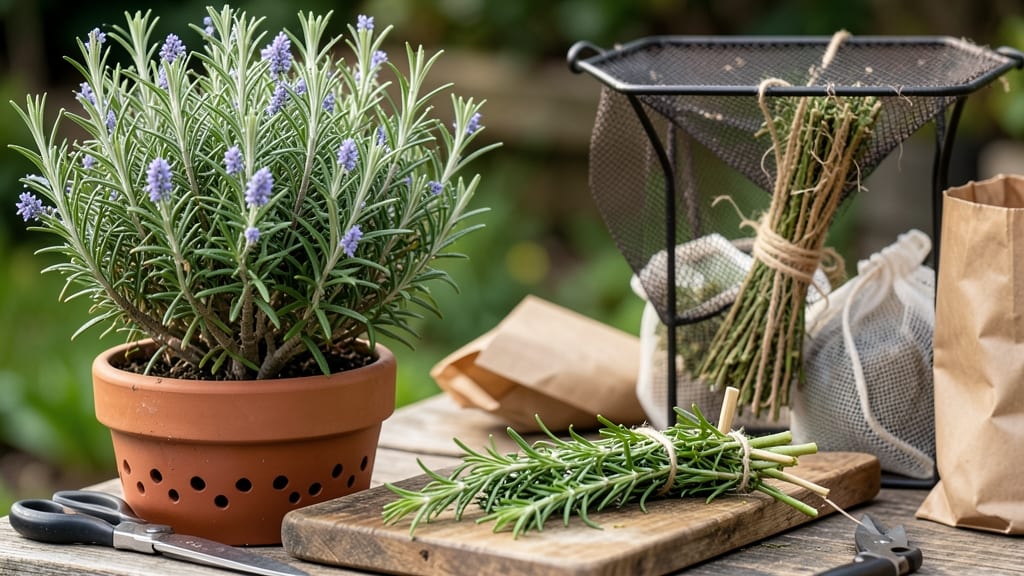
How to dry rosemary naturally unlocks its full flavor for winter cooking. ✨ The secret lies in harvesting at the right time—just before flowering when the needles are fragrant and vibrant green. Most people rush this step, but patience here means the difference between potent dried herbs and dusty remnants.
You’ll need only three things: fresh rosemary sprigs, a clean space, and either sunlight or gentle heat. Bundle stems together and hang upside down in a dark, dry spot for 2-3 weeks.
The needles will crisp up beautifully, retaining their aroma far better than store-bought dried herbs. For faster results, try a low oven setting (around 200°F) for 1-2 hours.
Once fully dried, store the sprigs in airtight containers away from light. The flavor intensifies over time, making it perfect for soups, roasts, or homemade herb blends. A little goes a long way—just a pinch adds depth to dishes without overpowering them.
This method works for any rosemary variety, whether grown in pots or garden beds. The key is consistency in drying conditions—too much moisture ruins the process. Now you’ve got a year-round supply of sun-kissed herbs ready whenever you need them.
📚 In This Guide
- What you need
- Instructions
- Tips and common mistakes
- Wrapping up and next steps
What you need
- ● Fresh rosemary sprigs: Harvest organic, pesticide-free rosemary (about 1–2 cups) with 3–4 inches of stem attached. Choose sprigs that are vibrant green and free of wilting or yellowing.
- ○ Clean, sharp scissors or pruning shears: Use these to trim stems at a 45-degree angle for better water absorption (optional but helpful).
- ● Paper towels or a clean kitchen towel: For gently pat-drying excess moisture from the sprigs before drying.
- ● Drying method of choice (pick one): Sun drying: A bright, dry, well-ventilated spot (e.g., a windowsill, porch, or balcony) with indirect sunlight (direct sun can scorch leaves).
- ● Air drying (hanging): A drying rack, mesh bag, or paper bag with holes for airflow.
- ● Oven drying (backup method): A low-temperature oven (95–115°F or 35–46°C) and a baking sheet lined with parchment paper.
- ○ Air-tight storage container: A glass jar, tin, or resealable bag with a silicone desiccant packet (optional but extends shelf life).
- ● A fan or dehumidifier to speed up air drying in humid climates.
- ● Labeling tags to mark the herb and drying date.
- ● A small mesh bag for hanging sprigs during air drying (easier than tying stems!).
- ● Food-grade essential oils (like lemon or lavender) for adding a subtle aroma to dried rosemary (use sparingly!).
Step-by-step instructions for drying rosemary naturally
Here’s how I dry rosemary in hours—not days—using just sunlight and a little patience.
☀️ Step 1: Harvest at Peak Freshness
Pick rosemary stems on a dry morning after the dew has evaporated. The best time is just before flowering, when the leaves are fragrant and vibrant green. Cut stems about 4-6 inches long, leaving a few inches of bare stem for handling. Avoid wilted or yellowing branches—they won’t dry evenly.
Shake off excess dirt and trim any brown or damaged leaves with clean scissors. I like to bundle 3-4 stems together with a rubber band at the base—this keeps them upright and makes hanging easier. The tighter the bundle, the more air circulates around the stems, speeding up drying.
🌿 Step 2: Bundle and Hang in Direct Sunlight
Find a spot with full sun exposure—a windowsill, patio table, or even a sunny tree branch works. Hang bundles upside down (bare stems facing down) so air flows freely around the leaves. The goal is to dry the rosemary in 1-3 hours, not days, so choose a warm, breezy day.
If you’re indoors, prop the bundles near a south-facing window where they’ll get direct light. Avoid stuffy rooms or areas with high humidity—they slow drying and risk mold. You’ll know it’s ready when the leaves crumble easily between your fingers and the stems snap cleanly when bent.
⏰ Step 3: Test for Dryness and Store Properly
After 1-3 hours, check a few leaves. They should be dry to the touch with no moisture left—no dampness, no stiffness. If they still feel slightly pliable, leave them another hour. Over-drying turns leaves brittle, but under-drying means they’ll mold in storage.
Once fully dry, remove the rubber bands and strip the leaves from the stems. Store them in an airtight container (I use small glass jars) away from light and heat. Label with the date—properly dried rosemary stays potent for 6-12 months. If you notice any musty smells, discard it immediately.
💧 Step 4: Optional Speed-Drying Tricks (For Cloudy Days)
If your climate is humid or overcast, speed up drying with a fan. Place bundles near a gentle breeze (not direct airflow) to evaporate moisture faster. A small desk fan on low, aimed at the bundles, can cut drying time in half—just keep it 6 inches away to avoid scattering leaves.
For large batches, I sometimes lay stems flat on a baking sheet lined with parchment paper in the sun. Flip them halfway through drying to ensure even exposure. Just avoid direct midday heat—it can scorch the leaves before they dry properly.
Tips & tricks for perfect sun-dried rosemary
Here's what nobody tells you about drying rosemary that'll make all the difference between good and extraordinary results.
Harvest Timing: The morning after dew has evaporated is non-negotiable for peak freshness. I learned this the hard way—harvesting in the afternoon can leave your rosemary with a bitter edge. Look for stems where the leaves are still tightly packed and vibrant green, just before any flower buds appear. This is when the essential oils are at their strongest, which means more flavor in your dried herb.
Bundle Tightness: When you bundle those 3-4 stems together, make them snug—this isn't just about organization. Tight bundles create better air circulation around each leaf, which is what speeds up that 1-3 hour drying window. I use rubber bands that leave no marks, but you could also twist the stems together and secure with twine if you prefer. The key is leaving those bare stems exposed at the bottom for easy hanging.
Sunlight Strategy: Direct sunlight is your friend, but timing matters. Midday sun can scorch leaves before they dry properly, especially on hot days. I aim for morning sunlight—it's gentle enough to dry without burning. If you must use afternoon sun, create shade with a sheer curtain or light-colored cloth to diffuse the intensity while still getting that full sun exposure we need for proper drying.
Storage Wisdom: That airtight container isn't just for keeping bugs out—it's about preserving moisture balance. I store my dried rosemary in small glass jars with the lid loosely closed at first, then tighten completely after 24 hours. This prevents condensation from forming, which can lead to mold. And here's a pro move: add a bay leaf or two to each jar for extra preservation power and complementary flavor.
Pro Tips for Dry Rosemary Naturally
- Here's what nobody tells you about drying rosemary that'll make all the difference between good and extraordinary res...
- Harvest Timing: The morning after dew has evaporated is non-negotiable for peak freshness. I learned this the hard wa...
- Bundle Tightness: When you bundle those 3-4 stems together, make them snug—this isn't just about organization. Tight ...
Frequently asked questions
Got questions about drying rosemary the natural way?
Here are answers to the most common ones—so you can dry your herbs like a pro without the guesswork!
How long does it take to dry rosemary in the sun?
Sun-drying rosemary typically takes 2–5 days, depending on humidity and sunlight. In hot, dry climates, it can be ready in just a few hours! Check daily—once the leaves are crispy and brittle, they’re fully dried. If rain is forecast, move them indoors or under a shelter.
What if my rosemary isn’t drying fast enough?
If your rosemary feels damp or smells musty after a few days, try these fixes:
- Increase airflow: Hang sprigs in a breezy spot or use a small fan on low.
- Reduce humidity: Move to a dry, shaded area (like a garage) if the air is muggy.
- Speed it up: Toss sprigs in a 200°F (93°C) oven for 10–15 minutes if you’re in a hurry.
Can I dry rosemary without sun exposure?
If you lack sunlight, try these alternatives:
- Oven-drying: Spread sprigs on a baking sheet at 200°F (93°C) for 1–2 hours, checking often.
- Dehydrator: Set to 95°F (35°C) for 2–4 hours until crisp.
- Air-drying indoors: Bundle stems and hang upside down in a warm, dark place (like a closet) for 1–2 weeks.
How do I know when rosemary is fully dried?
Rosemary is ready when:
- The leaves crunch easily between your fingers.
- The stems snap (not bend) when broken.
- The aroma is intense and fresh—not damp or earthy.
If any leaves feel soft or stick together, keep drying them for another day or two.
Will drying rosemary ruin its flavor?
Not at all! Drying concentrates rosemary’s flavor, making it even more potent for cooking. Just avoid over-drying—if it tastes bitter or dull, it may have lost moisture too quickly. Store dried rosemary in an airtight container away from light to preserve its punch for up to a year.
Wrapping up and next steps
Drying rosemary naturally is a simple, rewarding way to preserve its fragrant magic for months—no fancy equipment required! Whether you opt for sun-drying or air-drying, the key is patience and proper airflow. Your effort will pay off with aromatic sprigs ready to elevate soups, roasts, or homemade remedies.
Now that you’re armed with these tips, give it a try today! Start small with a fresh bundle, experiment with placement, and soon you’ll have a pantry stocked with sun-kissed rosemary. Happy drying—and may your kitchen always smell like summer! 🌿✨