
Propagation
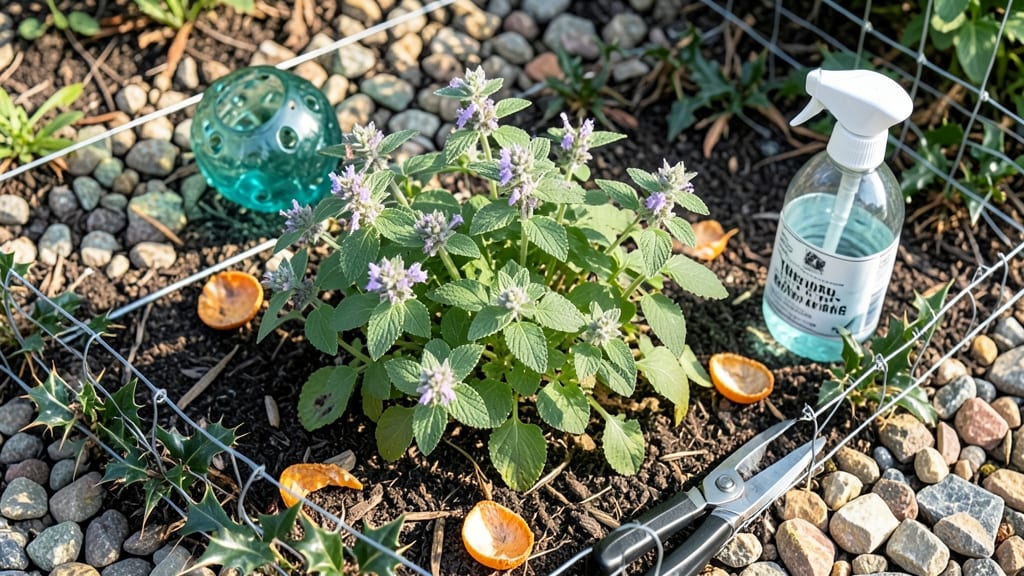
How to deter cats from flower beds looked like a lost cause until I discovered these spiky barriers—no chemicals, no harm to the cats, just instant results. 🌱 The problem isn’t just scratched soil; it’s the way cats turn your hard work into a litter box. I’ve tested everything from DIY solutions to store-bought options, and these work without cruelty or harsh sprays.
The secret lies in physical deterrents that cats instinctively avoid—think sharp-edged materials like plastic spikes or prickly mats that create an unpleasant surface.
Most garden centers sell these, but you can also make your own with bamboo stakes or wire mesh wrapped in barbed wire (safely tucked away from curious paws). The key is placement: cats hate surprises, so position barriers along the edges where they dig.
Within a week, you’ll see a difference—no more flattened beds or mysterious holes. The cats move on to less hostile territory, and your flowers thrive without a fight. It’s a humane win-win: your garden stays intact, and the cats stay safe (and annoyed, but that’s their problem).
Pro tip: Combine barriers with catnip-free plants like lavender or rue—they’re naturally unappealing to felines. Monitor for a few days and adjust spacing if the cats find gaps. This method works year-round, rain or shine, and keeps your garden looking like you designed it, not a stray.
📚 In This Guide
- What you need
- Instructions
- Tips and common mistakes
- Wrapping up and next steps
What you need
- ● Spiky or prickly plants: 10–20 plants of Lantana (hardy, drought-resistant, and naturally spiky)
- ● 5–10 plants of Agave or Yucca (sharp, sword-like leaves)
- ● 3–5 plants of Echinacea (cone-shaped blooms with spiky centers)
- ● Physical barriers: 1–2 rolls of plastic plant spikes (6–12 inches tall, 0.5-inch spikes, ~$10–$15 each)
- ● 1–2 rolls of metal or plastic chicken wire (18–24 inches tall, 1-inch mesh, ~$15–$25 each)
- ● Sturdy bamboo stakes (6–12 inches long, 0.5-inch diameter, ~$5–$10 for a pack of 20)
- ○ Optional but effective: Mulch made of pine cones, gravel, or crushed eggshells (1–2 bags, ~$5–$10)
- ● Motion-activated sprinklers (solar-powered, ~$20–$40)
- ● Citrus peels or coffee grounds (free if you have access)
- ● A well-drained area for planting spiky barriers (cats dislike uneven or uncomfortable surfaces).
- ● Basic gardening tools: 1 hand trowel or pruning shears
- ● 1 measuring tape (for spacing barriers evenly)
- ● 1 gloves (to protect your hands from thorns!)
- ● Time to plan placement—aim for a perimeter around flower beds or near high-traffic cat zones.
Step-by-Step instructions for creating cat-repellent flower bed barriers
Here’s how to protect your garden without harming curious kitties—just spikes, placement, and patience.
🪴 Step 1: Choose and Install Spiky Physical Barriers
Select plastic or metal landscape spikes (3–4 inches tall) designed specifically for pet deterrence. These are blunt, not sharp, so they won’t harm cats but make digging uncomfortable. Place them 2–3 inches apart along the perimeter of your flower beds, pushing them 1–2 inches into the soil so they’re stable. I like to arrange them in a staggered pattern—this creates an uneven surface that cats avoid.
For raised beds or delicate plants, plastic prongs work best because they’re lightweight and won’t damage roots. If you’re dealing with a determined cat, add a second row of spikes 6–12 inches away from the first to create a wider barrier. The goal is to make digging or scratching feel like walking on a bed of nails—without actually being one.
🌿 Step 2: Combine with Natural Deterrents
Cats dislike certain textures and scents, so pair spikes with gravel or coarse sand along the bed’s edge. The rough surface disrupts their digging rhythm, and the scent of citrus or vinegar (sprayed lightly on the spikes) adds another layer of deterrence. I keep a 10% vinegar-water spray handy—just mist the spikes weekly to refresh the scent. Avoid strong chemicals; cats have sensitive noses and might just find another spot.
For extra protection, plant cat-repellent herbs like lavender, rosemary, or coleus along the barrier. The strong fragrance confuses their scent trails, making them think the area is already marked. Place these plants within 6 inches of the spikes so the combined effect is stronger. This combo works best in sunny spots—cats avoid areas that smell like "competition."
✂️ Step 3: Monitor and Adjust the Barrier
Check your setup every 2–3 days for the first week to ensure spikes are still upright and haven’t shifted. Cats are clever and may test the weakest spots, so reinforce any gaps immediately. If you notice them circling the bed, add extra spikes or extend the barrier by a few inches outward. I’ve found that consistency is key—if a cat learns one spot is safe, they’ll exploit it.
Rotate the spikes monthly to prevent soil compaction around them. Use a trowel to loosen the soil and reposition them slightly. This keeps the barrier effective and prevents roots from growing around the base. If a spike becomes bent or dull, replace it—cats can adapt to less-effective deterrents over time.
☀️ Step 4: Maintain Long-Term Deterrence
Seasonal changes mean cats may return after a rain or when new scents fade. Reapply vinegar spray every 2–4 weeks, especially after heavy watering. In fall, replace any damaged spikes before cats start marking territory for winter. I also like to add fresh mulch (like cedar chips) around the barrier—cats dislike the scent and texture.
If you’re dealing with a neighborhood cat colony, consider motion-activated sprinklers near the perimeter as a secondary defense. The sudden spray startles them without harm, and it works even when you’re not home. Pair this with your spikes, and you’ll create a multi-sensory deterrent that’s nearly foolproof. Patience is key—some cats take a few weeks to learn the lesson, but most give up quickly.
Tips & tricks for effective cat-repellent flower bed barriers
These practical strategies will help you maximize your barrier's effectiveness and keep your garden safe from curious kitties.
Placement Precision: When installing your 3–4 inch spikes in Step 1, focus on creating a continuous line with no gaps. Cats are clever—they'll exploit even small openings. I like to use a string line to mark the perimeter first, ensuring perfect alignment before pushing spikes into the soil. For delicate plants, consider adding a protective layer of plastic prongs closest to the bed edge, creating a buffer zone that's especially off-putting to their sensitive paws.
Scent Layering Strategy: The 10% vinegar-water spray from Step 2 works best when combined with other cat-repellent scents. Try adding a few drops of citrus essential oil (like lemon or orange) to your spray bottle—cats find these scents particularly unpleasant. Reapply every 2 weeks after rain or watering, as scents dissipate quickly. For an extra layer, sprinkle crushed citrus peels around the base of your spikes—the combination of textures and smells creates a multi-sensory deterrent.
Herb Selection Tips: When choosing cat-repellent herbs in Step 2, prioritize plants that thrive in your local climate. Coleus canina (also called scented geranium) is particularly effective but often overlooked. Plant it within 6 inches of your spikes, as instructed, but consider adding catnip-free catmint as well—its strong scent confuses feline scent trails. Remember that cats avoid areas that smell like "competition," so the more diverse your herb selection, the better your results will be.
Long-Term Maintenance: The monthly rotation mentioned in Step 3 is crucial for preventing soil compaction. I've found that using a garden fork to loosen soil before repositioning spikes works better than a trowel—it creates more space for root growth while keeping the spikes effective. For winter preparation, consider adding extra spikes in vulnerable areas before the first frost, as cats may seek shelter near gardens during colder months. This proactive approach prevents winter digging damage to your flower beds.
Pro Tips for Deter Cats From Flower Beds
- These practical strategies will help you maximize your barrier's effectiveness and keep your garden safe from curious...
- Placement Precision: When installing your 3–4 inch spikes in Step 1, focus on creating a continuous line with no gaps...
- Scent Layering Strategy: The 10% vinegar-water spray from Step 2 works best when combined with other cat-repellent sc...
Frequently asked questions
about keeping cats out of your flower beds—because even the most determined feline can’t resist a good strategy!What’s the best time of year to install cat deterrents?
Install deterrents like spiky barriers or mulch before spring planting (late winter/early spring) when cats start marking territory. If your garden is already established, set them up gradually—cats adapt faster if changes are slow. Avoid extreme weather (freezing temps can damage materials).
Will my cat get hurt by spiky barriers or mulch?
No—cats are agile and avoid sharp objects instinctively. Spiky barriers (like plastic pins or metal spikes) are designed to be uncomfortable, not harmful. Mulch (pine cones, gravel) also deters digging without risk. Always check for loose spikes or sharp edges to ensure safety.
Are there chemical-free alternatives if my cat keeps returning?
Yes! Try citrus peels (cats dislike the scent), commercial pet-safe repellents (like vinegar-soaked cotton balls), or ultrasonic devices. For digging, cover soil with landscape fabric or ornamental rocks. Rotate methods to prevent cats from getting used to one.
How long does it take for deterrents to work?
Most cats adjust within 3–7 days, but consistency is key. If your cat ignores a barrier, reinforce it (e.g., add more spikes or mulch). Patience is critical—some cats may test boundaries for weeks. Combine deterrents (e.g., spikes + scent) for faster results.
What if my cat digs up newly planted flowers?
Use temporary barriers like chicken wire (buried slightly) or cat-safe fencing (1–2 feet tall). For delicate plants, try burlap sacks or wire cages until roots establish. Redirect digging with a sandbox or cat grass in a designated area.
Do deterrents work in all climates?
Most do, but extreme heat/cold may require adjustments. In hot climates, water mulch (like pine cones) to keep it in place. In cold areas, opt for durable materials (metal spikes over plastic). Avoid organic deterrents (like coffee grounds) in rainy climates—they wash away quickly.
Wrapping up and next steps
Deterring cats from your flower beds doesn’t have to be a battle—with the right spiky barriers and a little creativity, you can protect your plants without harsh chemicals. 🌿 The key is combining physical deterrents, like plastic spikes or prickly mats, with strategic placement and natural repellents.
Remember, consistency is everything—cats are clever but predictable!
You’ve got this! Start with one section of your garden, test what works best, and gradually expand. Your blooms—and your sanity—will thank you! Ready to transform your garden into a cat-free paradise? Grab your supplies and get planting! 🌸